Springboot整合web组件
整合Servlet、Filter、Listener
SpringBoot中有两种方式可以添加 Servlet、Filter、Listener。
代码注册
通过ServletRegistrationBean、 FilterRegistrationBean 和 ServletListenerRegistrationBean 获得控制。
WebConfig
新建WebConfig 类,用于bean的注入,内容如下:
@Configuration
public class WebConfig {

    /**
     * servletRegistrationBean:(使用代码注册Servlet(不需要@ServletComponentScan注解)).
     */
    @Bean
    public ServletRegistrationBean servletRegistrationBean() {
        ServletRegistrationBean registrationBean = new ServletRegistrationBean();
        registrationBean.setServlet(new XbqServlet());
        List<String> urlMappings = new ArrayList<String>();
        // 访问,可以添加多个
        urlMappings.add("/xbq/servlet");
        registrationBean.setUrlMappings(urlMappings);
        registrationBean.setLoadOnStartup(1);
        return registrationBean;
    }

    /**
     * getDemoFilter:(使用代码注册拦截器).
     */
    @Bean
    public FilterRegistrationBean getDemoFilter() {
        XbqFilter demoFilter = new XbqFilter();
        FilterRegistrationBean registrationBean = new FilterRegistrationBean();
        registrationBean.setFilter(demoFilter);
        List<String> urlPatterns = new ArrayList<String>();
        urlPatterns.add("/*");                            //拦截路径,可以添加多个
        registrationBean.setUrlPatterns(urlPatterns);
        registrationBean.setOrder(1);
        return registrationBean;
    }

    /**
     * getDemoListener:(使用代码 引用 监听器).
     */
    @Bean
    public ServletListenerRegistrationBean<EventListener> getDemoListener() {
        ServletListenerRegistrationBean<EventListener> registrationBean = new ServletListenerRegistrationBean<>();
        registrationBean.setListener(new XbqListener());
        registrationBean.setOrder(1);
        return registrationBean;
    }
}
XbqServlet
public class XbqServlet extends HttpServlet {

    private static final long serialVersionUID = 1L;

    @Override
    protected void doGet(HttpServletRequest req, HttpServletResponse resp) throws ServletException, IOException {
        this.doPost(req, resp);
    }

    @Override
    protected void doPost(HttpServletRequest req, HttpServletResponse resp) throws ServletException, IOException {
        resp.setCharacterEncoding("UTF-8");
        resp.setContentType("text/html");
        PrintWriter out = resp.getWriter();
        out.println("<html>");
        out.println("<head>");
        out.println("<title>Hello World</title>");
        out.println("</head>");
        out.println("<body><center>");
        out.println("<h3>我是通过代码注册Servlet</h3>");
        out.println("</center></body>");
        out.println("</html>");
    }
}
XbqFilter
public class XbqFilter implements Filter {

    private static Logger logger = LoggerFactory.getLogger(XbqFilter.class);

    @Override
    public void init(FilterConfig filterConfig) throws ServletException {
        logger.info("--xbq--初始化JoeFilter!");
    }

    @Override
    public void doFilter(ServletRequest request, ServletResponse response, FilterChain chain) throws IOException, ServletException {
        HttpServletRequest req = (HttpServletRequest)request;
        logger.info(req.getRequestURL() + "---xbq---> doFilter ");
        chain.doFilter(request, response);
    }

    @Override
    public void destroy() {
        logger.info("--xbq--销毁JoeFilter!");
    }

}
XbqListener
public class XbqListener implements ServletContextListener {

    private static Logger logger = LoggerFactory.getLogger(XbqListener.class);

    @Override
    public void contextInitialized(ServletContextEvent sce) {
        logger.info("--xbq-监听器-ServletContext 初始化");
        logger.info(sce.getServletContext().getServerInfo());
    }

    @Override
    public void contextDestroyed(ServletContextEvent sce) {
        logger.info("--xbq-监听器-ServletContext 销毁");
    }
}
通过注解自动注册
在 SpringBootApplication 上使用@ServletComponentScan 注解后,Servlet、Filter、Listener 可以直接通过 @WebServlet(urlPatterns = “/test/*”)、@WebFilter、@WebListener 注解自动注册,这些注解都是JDK的,无需其他代码。
配置启动类
在启动类添加@ServletComponentScan
@SpringBootApplication
@ServletComponentScan
public class DemoApplication
JoeServlet
@WebServlet(urlPatterns = "/joe/*")
public class JoeServlet extends HttpServlet {

    private static final long serialVersionUID = 1L;

    @Override
    protected void doGet(HttpServletRequest req, HttpServletResponse resp) throws ServletException, IOException {
        this.doPost(req, resp);
    }

    @Override
    protected void doPost(HttpServletRequest req, HttpServletResponse resp) throws ServletException, IOException {
        resp.setCharacterEncoding("UTF-8");
        resp.setContentType("text/html");
        PrintWriter out = resp.getWriter();
        out.println("<html>");
        out.println("<head>");
        out.println("<title>Hello World</title>");
        out.println("</head>");
        out.println("<body><center>");
        out.println("<h3>我是通过   @WebServlet 注解注册Servlet的</h3>");
        out.println("</center></body>");
        out.println("</html>");
    }
}
JoeFilter
@WebFilter(filterName = "joeFilter", urlPatterns = "/*")
public class JoeFilter implements Filter {

    private static Logger logger = LoggerFactory.getLogger(JoeFilter.class);

    @Override
    public void init(FilterConfig filterConfig) throws ServletException {
        logger.info("--joe--初始化JoeFilter!");
    }

    @Override
    public void doFilter(ServletRequest request, ServletResponse response, FilterChain chain) throws IOException, ServletException {
        HttpServletRequest req = (HttpServletRequest) request;
        logger.info(req.getRequestURL() + "---joe---> doFilter");
        chain.doFilter(request, response);
    }

    @Override
    public void destroy() {
        logger.info("--joe--销毁JoeFilter!");
    }
}
JoeListener
@WebListener
public class JoeListener implements ServletContextListener {

    private static Logger logger = LoggerFactory.getLogger(JoeListener.class);

    @Override
    public void contextInitialized(ServletContextEvent sce) {
        logger.info("--Joe-监听器-ServletContext 初始化");
        logger.info(sce.getServletContext().getServerInfo());
    }

    @Override
    public void contextDestroyed(ServletContextEvent sce) {
        logger.info("--Joe-监听器-ServletContext 销毁");
    }
}
自定义SpringMVC 配置
用过 Spring Boot 的小伙伴都知道,我们只需要在项目中引入 spring-boot-starter-web 依赖,SpringMVC 的一整套东西就会自动给我们配置好,但是,真实的项目环境比较复杂,系统自带的配置不一定满足我们的需求,往往我们还需要结合实际情况自定义配置。
自定义配置就有讲究了,由于 Spring Boot 的版本变迁,加上这一块本身就有几个不同写法,很多小伙伴在这里容易搞混,今天就来和大家说一说这个问题。
概览
首先我们需要明确,跟自定义 SpringMVC 相关的类和注解主要有如下四个:
- WebMvcConfigurerAdapter
- WebMvcConfigurer
- WebMvcConfigurationSupport
- @EnableWebMvc
这四个中,除了第四个是注解,另外三个两个类一个接口,里边的方法看起来好像都类似,但是实际使用效果却大不相同,因此很多小伙伴容易搞混,今天松哥就来和大家聊一聊这个问题。
WebMvcConfigurerAdapter
我们先来看 WebMvcConfigurerAdapter,这个是在 Spring Boot 1.x 中我们自定义 SpringMVC 时继承的一个抽象类,这个抽象类本身是实现了 WebMvcConfigurer 接口,然后抽象类里边都是空方法,我们来看一下这个类的声明:
public abstract class WebMvcConfigurerAdapter implements WebMvcConfigurer {
    //各种 SpringMVC 配置的方法
}
再来看看这个类的注释:
/**
 * An implementation of {@link WebMvcConfigurer} with empty methods allowing
 * subclasses to override only the methods they're interested in.
 * @deprecated as of 5.0 {@link WebMvcConfigurer} has default methods (made
 * possible by a Java 8 baseline) and can be implemented directly without the
 * need for this adapter
 */
这段注释关于这个类说的很明白了。同时我们也看到,从 Spring5 开始,由于我们要使用 Java8,而 Java8 中的接口允许存在 default 方法,因此官方建议我们直接实现 WebMvcConfigurer 接口,而不是继承 WebMvcConfigurerAdapter 。
也就是说,在 Spring Boot 1.x 的时代,如果我们需要自定义 SpringMVC 配置,直接继承 WebMvcConfigurerAdapter 类即可。
WebMvcConfigurer
WebMvcConfigurer 是我们在 Spring Boot 2.x 中实现自定义配置的方案。
WebMvcConfigurer 是一个接口,接口中的方法和 WebMvcConfigurerAdapter 中定义的空方法其实一样,所以用法上来说,基本上没有差别,从 Spring Boot 1.x 切换到 Spring Boot 2.x ,只需要把继承类改成实现接口即可。
WebMvcConfigurationSupport
前面两个都好理解,还有一个 WebMvcConfigurationSupport ,这个又是干什么用的呢?
在这里首先大家需要明确的是,WebMvcConfigurationSupport 类本身是没有问题的,我们自定义 SpringMVC 的配置是可以通过继承 WebMvcConfigurationSupport 来实现的。但是继承 WebMvcConfigurationSupport 这种操作我们一般只在 Java 配置的 SSM 项目中使用,Spring Boot 中基本上不会这么写,为什么呢?
小伙伴们知道,Spring Boot 中,SpringMVC 相关的自动化配置是在 WebMvcAutoConfiguration 配置类中实现的,那么我们来看看这个配置类的生效条件:
@Configuration
@ConditionalOnWebApplication(type = Type.SERVLET)
@ConditionalOnClass({ Servlet.class, DispatcherServlet.class, WebMvcConfigurer.class })
@ConditionalOnMissingBean(WebMvcConfigurationSupport.class)
@AutoConfigureOrder(Ordered.HIGHEST_PRECEDENCE + 10)
@AutoConfigureAfter({ DispatcherServletAutoConfiguration.class, TaskExecutionAutoConfiguration.class,
		ValidationAutoConfiguration.class })
public class WebMvcAutoConfiguration {
}
我们从这个类的注解中可以看到,它的生效条件有一条,就是当不存在 WebMvcConfigurationSupport 的实例时,这个自动化配置才会生生效。因此,如果我们在 Spring Boot 中自定义 SpringMVC 配置时选择了继承 WebMvcConfigurationSupport,就会导致 Spring Boot 中 SpringMVC 的自动化配置失效。
Spring Boot 给我们提供了很多自动化配置,很多时候当我们修改这些配置的时候,并不是要全盘否定 Spring Boot 提供的自动化配置,我们可能只是针对某一个配置做出修改,其他的配置还是按照 Spring Boot 默认的自动化配置来,而继承 WebMvcConfigurationSupport 来实现对 SpringMVC 的配置会导致所有的 SpringMVC 自动化配置失效,因此,一般情况下我们不选择这种方案。
@EnableWebMvc
最后还有一个 @EnableWebMvc 注解,这个注解很好理解,它的作用就是启用 WebMvcConfigurationSupport。我们来看看这个注解的定义:
/**
 * Adding this annotation to an {@code @Configuration} class imports the Spring MVC
 * configuration from {@link WebMvcConfigurationSupport}, e.g.:
可以看到,加了这个注解,就会自动导入 WebMvcConfigurationSupport,所以在 Spring Boot 中,我们也不建议使用 @EnableWebMvc 注解,因为它一样会导致 Spring Boot 中的 SpringMVC 自动化配置失效。
总结
不知道上面的解释小伙伴有没有看懂?我再简单总结一下:
- Spring Boot 1.x 中,自定义 SpringMVC 配置可以通过继承 WebMvcConfigurerAdapter 来实现。
- Spring Boot 2.x 中,自定义 SpringMVC 配置可以通过实现 WebMvcConfigurer 接口来完成。
- 如果在 Spring Boot 中使用继承 WebMvcConfigurationSupport 来实现自定义 SpringMVC 配置,或者在 Spring Boot 中使用了 @EnableWebMvc 注解,都会导致 Spring Boot 中默认的 SpringMVC 自动化配置失效。
- 在纯 Java 配置的 SSM 环境中,如果我们要自定义 SpringMVC 配置,有两种办法,第一种就是直接继承自 WebMvcConfigurationSupport 来完成 SpringMVC 配置,还有一种方案就是实现 WebMvcConfigurer 接口来完成自定义 SpringMVC 配置,如果使用第二种方式,则需要给 SpringMVC 的配置类上额外添加 @EnableWebMvc 注解,表示启用 WebMvcConfigurationSupport,这样配置才会生效。换句话说,在纯 Java 配置的 SSM 中,如果你需要自定义 SpringMVC 配置,你离不开 WebMvcConfigurationSupport ,所以在这种情况下建议通过继承 WebMvcConfigurationSupport 来实现自动化配置。
整合JSP
POM文件增加依赖
<!-- 添加servlet依赖模块 -->
<dependency>
    <groupId>javax.servlet</groupId>
    <artifactId>javax.servlet-api</artifactId>
    <scope>provided</scope>
</dependency>
<!-- 添加jstl标签库依赖模块 -->
<dependency>
    <groupId>javax.servlet</groupId>
    <artifactId>jstl</artifactId>
</dependency>
<!--添加tomcat依赖模块.-->
<dependency>
    <groupId>org.springframework.boot</groupId>
    <artifactId>spring-boot-starter-tomcat</artifactId>
    <scope>provided</scope>
</dependency>

<!--注意:spring boot对jsp的支持不是很好,在使用spring boot自带tomcat的同时,还需要引入另外的一个tomcat,以来如下所示,且scope属性需要被注释掉 -->
<!--注掉的原因是:maven默认scope是compile,表示打包时会把此包打入jar包中,而provided表示打包时不会打如jar包中,因为它默认是jar包中会提供,说白了就是你标注了provided就不会被打入jar包中,项目跑起来就肯定会有问题了 2019/12/4 -->
<!-- 使用jsp引擎,springboot内置tomcat没有此依赖 -->
<dependency>
    <groupId>org.apache.tomcat.embed</groupId>
    <artifactId>tomcat-embed-jasper</artifactId>
    <scope>provided</scope>
</dependency>
配置application.properties
spring.mvc.view.prefix=/WEB-INF/jsp/
spring.mvc.view.suffix=.jsp
新建webapp目录
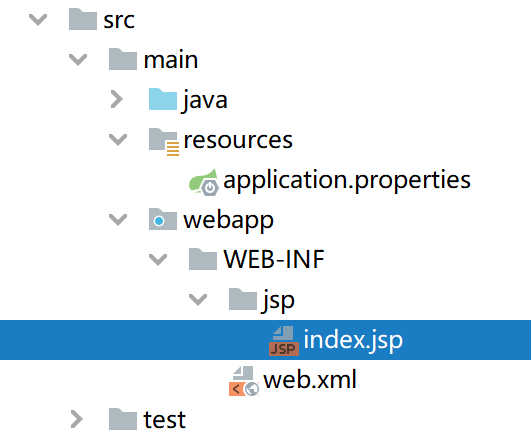
在 src/main 下面创建 webapp/WEB-INF/jsp 目录用来存放我们的jsp页面。
新建jsp
在WEB-INF/js目录下添加jsp
<%@ page language="java" contentType="text/html; charset=UTF-8" pageEncoding="UTF-8" %>
<!DOCTYPE html>
<html lang="zh">
<head>
    <meta http-equiv="Content-Type" content="text/html; charset=UTF-8"/>
    <title>Full Layout - jQuery EasyUI Demo</title>
</head>
<body>
<input type="button" value="点我"/>
<input type="text" style="height:100px;width:90%" id="input"/>
</body>
</html>
新建web.xml
在WEB-INF目录下添加web.xml
<?xml version="1.0" encoding="UTF-8"?>
<web-app xmlns="http://xmlns.jcp.org/xml/ns/javaee"
         xmlns:xsi="http://www.w3.org/2001/XMLSchema-instance"
         xsi:schemaLocation="http://xmlns.jcp.org/xml/ns/javaee http://xmlns.jcp.org/xml/ns/javaee/web-app_4_0.xsd"
         version="4.0">
</web-app>
编写controller
@Controller
public class TestController {
    @RequestMapping("/index")
    public String index(){
        return "index";
    }
}
idea进行相关的配置
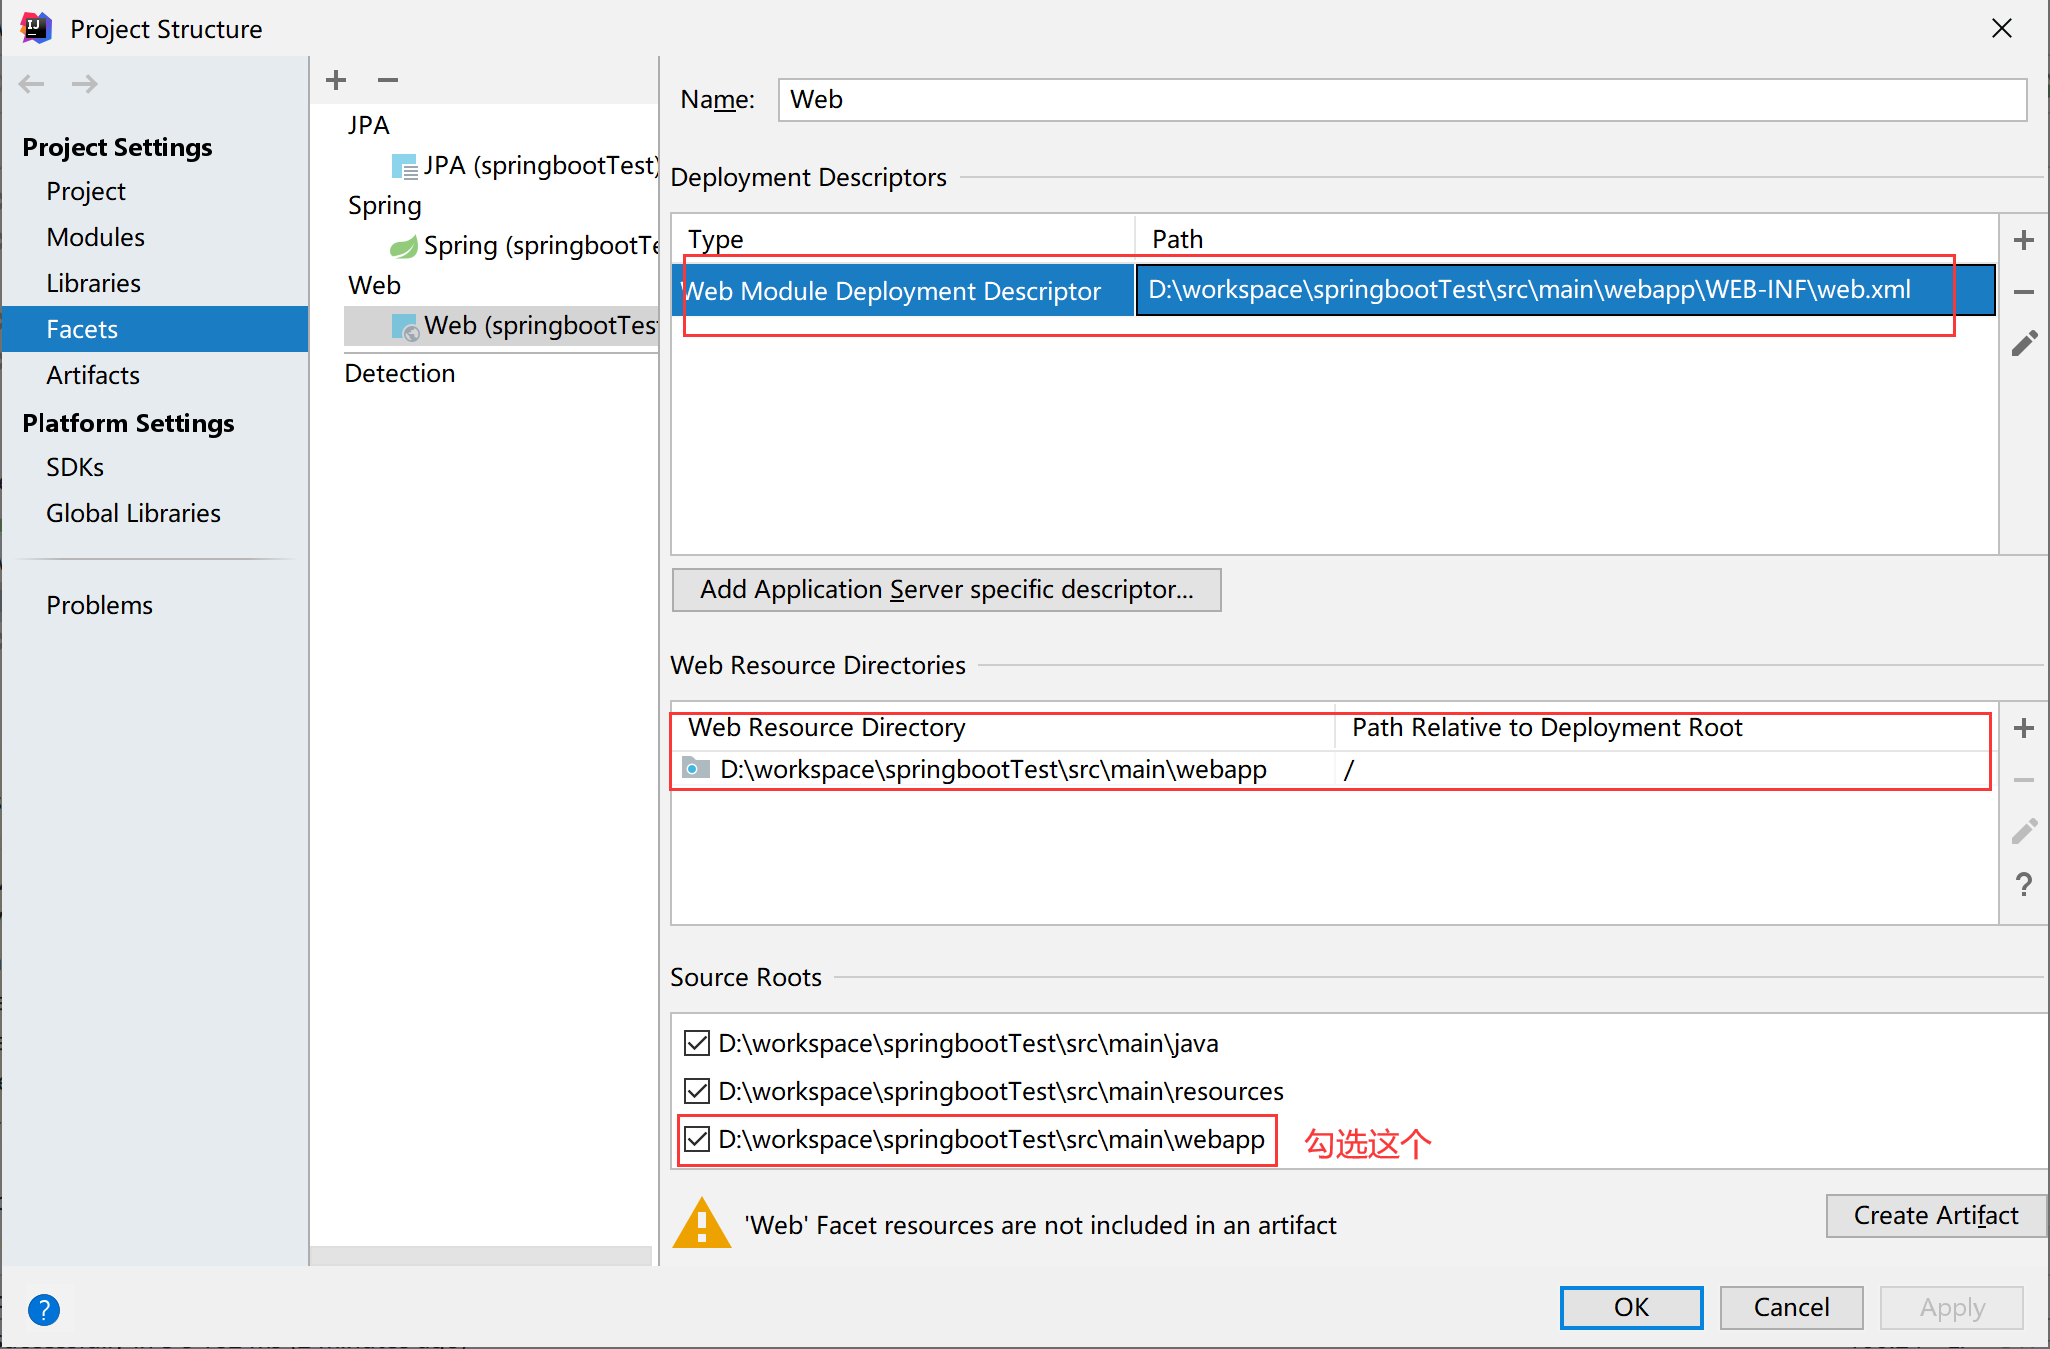
Intellij idea工具栏File->Project Structure,在弹出的页面中选Modules,中间一栏选Web(没有则按“+”号新建),然后设置Deployment Descriptors和Web Resource Directories(这个变量应该是默认就有的),其中Deployment Descriptors指向 项目名称/src/main/webapp/WEB-INF/web.xml,目前是没有web.xml的,会自动创建,Web Resource Directories默认是有的,不用修改。
配置 Https
https 简介
超文本传输安全协议(HyperText Transfer Protocol Secure),缩写:HTTPS;常称为 HTTP over TLS、HTTP over SSL 或 HTTP Secure)是一种通过计算机网络进行安全通信的传输协议。HTTPS 经由 HTTP 进行通信,但利用 SSL/TLS 来加密数据包。HTTPS 开发的主要目的,是提供对网站服务器的身份认证,保护交换数据的隐私与完整性。这个协议由网景公司(Netscape)在 1994 年首次提出,随后扩展到互联网上。
历史上,HTTPS 连接经常用于网络上的交易支付和企业信息系统中敏感信息的传输。在 2000 年代末至 2010 年代初,HTTPS 开始广泛使用,以确保各类型的网页真实,保护账户和保持用户通信,身份和网络浏览的私密性。
另外,还有一种安全超文本传输协议(S-HTTP),也是 HTTP 安全传输的一种实现,但是 HTTPS 的广泛应用而成为事实上的 HTTP 安全传输实现,S-HTTP并没有得到广泛支持。
准备工作
首先我们需要有一个 https 证书,我们可以从各个云服务厂商处申请一个免费的,不过自己做实验没有必要这么麻烦,我们可以直接借助 Java 自带的 JDK 管理工具 keytool 来生成一个免费的 https 证书。
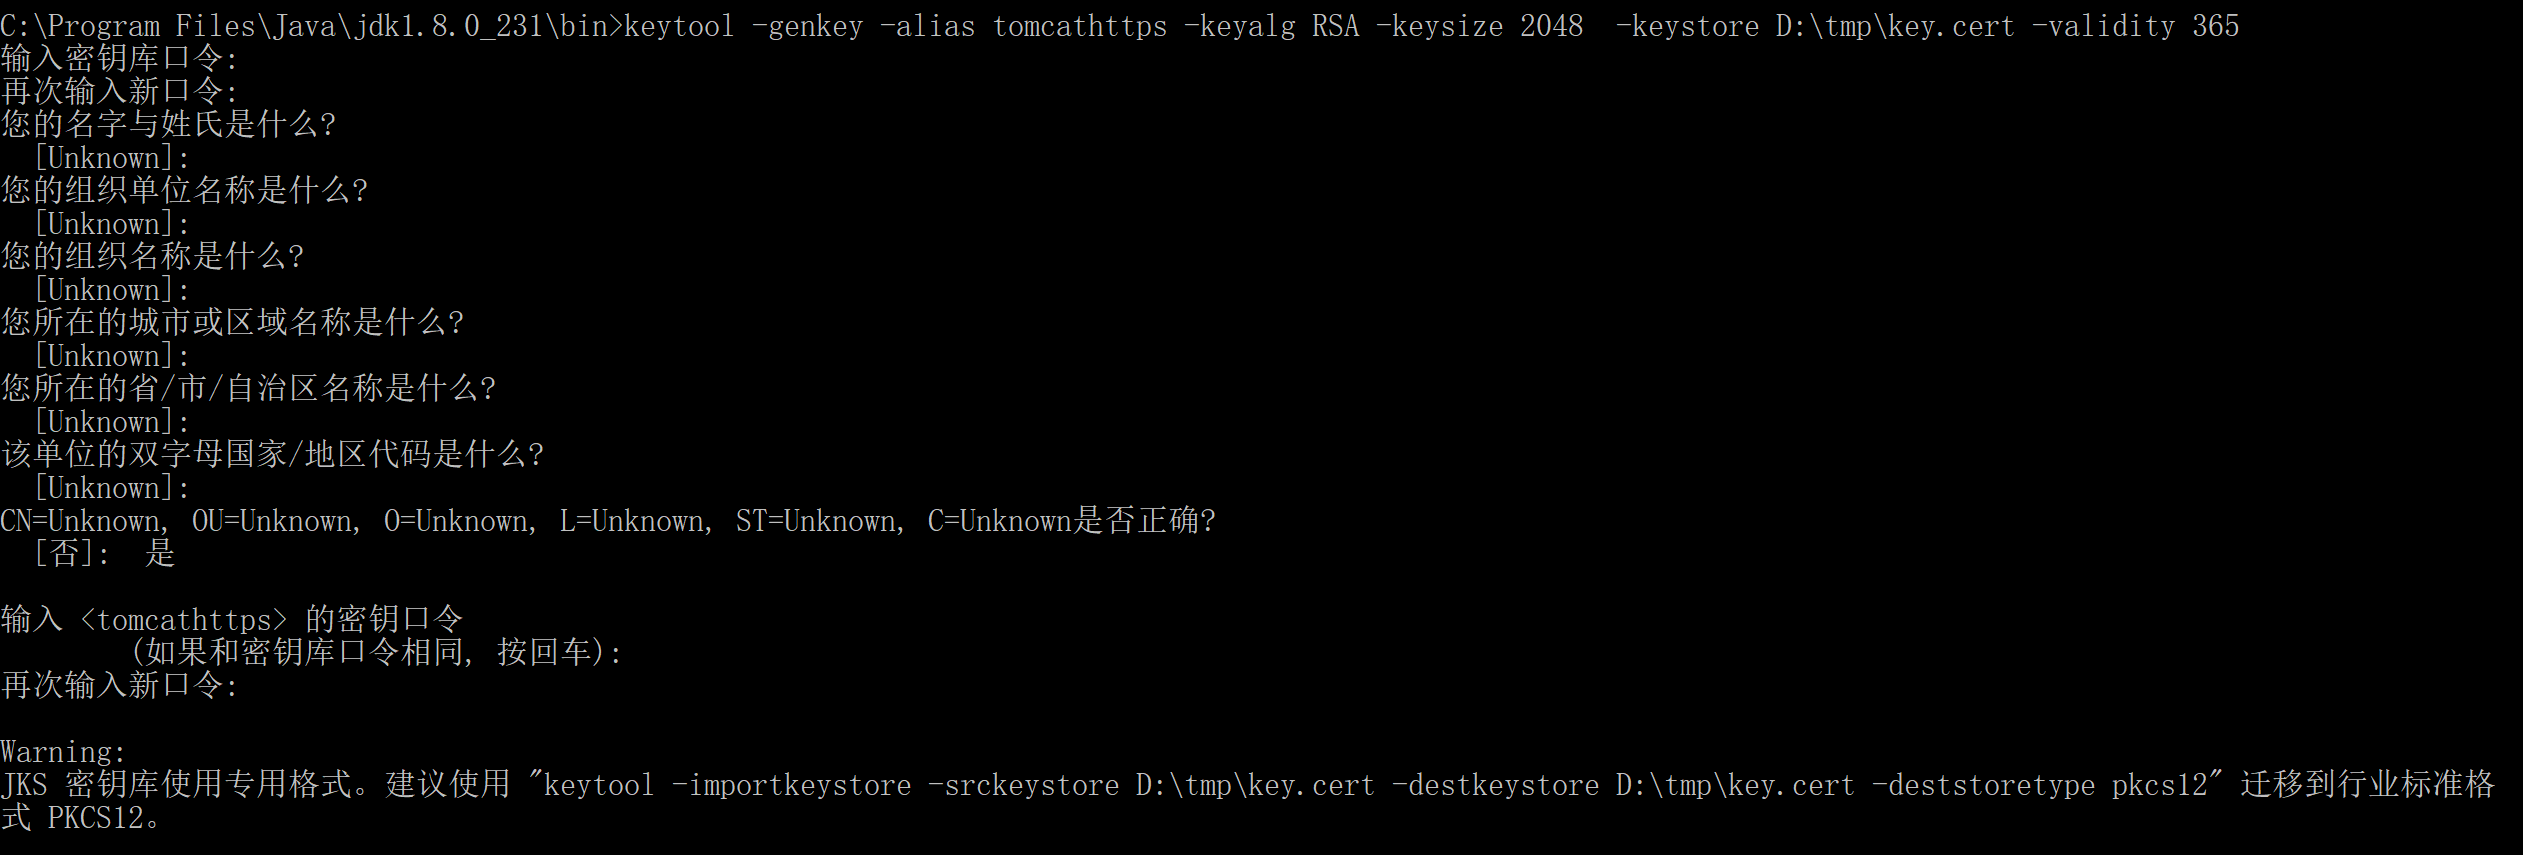
进入到 %JAVVA_HOME%\bin 目录下,执行如下命令生成一个数字证书:
keytool -genkey -alias tomcathttps -keyalg RSA -keysize 2048 -keystore D:\tmp\key.cert -validity 365命令含义如下:
- genkey 表示要创建一个新的密钥。
- alias 表示 keystore 的别名。
- keyalg 表示使用的加密算法是 RSA ,一种非对称加密算法。
- keysize 表示密钥的长度。
- keystore 表示生成的密钥存放位置。
- validity 表示密钥的有效时间,单位为天。
具体生成过程如下图:
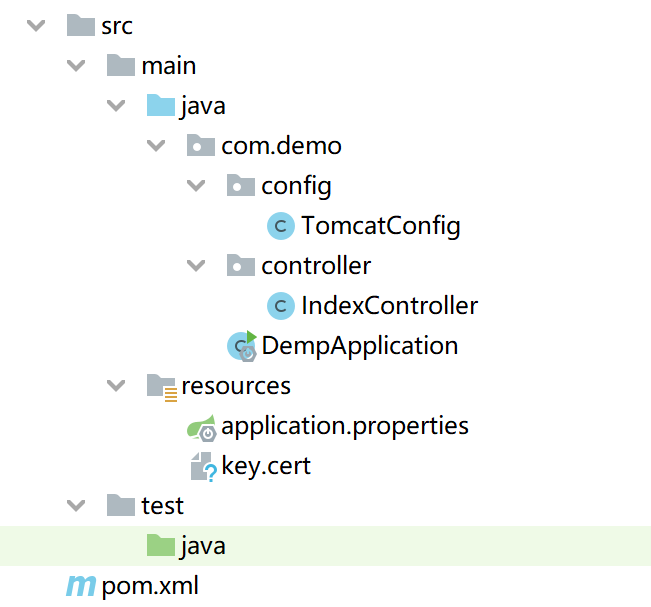
命令执行完成后 ,我们在 D:/tmp 盘目录下会看到一个名为key.cert的文件。如下图:
目录结构
引入 https
接下来我们需要在项目中引入 https。
将上面生成的 key.cert 拷贝到 Spring Boot 项目的 resources 目录下。然后在 application.properties 中添加如下配置:
#注意,这里是https访问的的端口号
server.port: 8443
server.ssl.key-store=classpath:key.cert
server.ssl.key-alias=tomcathttps
server.ssl.key-store-password=123456
其中:
- key-store表示密钥文件名。
- key-alias表示密钥别名。
- key-store-password就是在cmd命令执行过程中输入的密码。
配置完成后,就可以启动 Spring Boot 项目了,此时如果我们直接使用 Http 协议来访问接口,就会看到如下错误:

改用 https 来访问 ,结果如下:
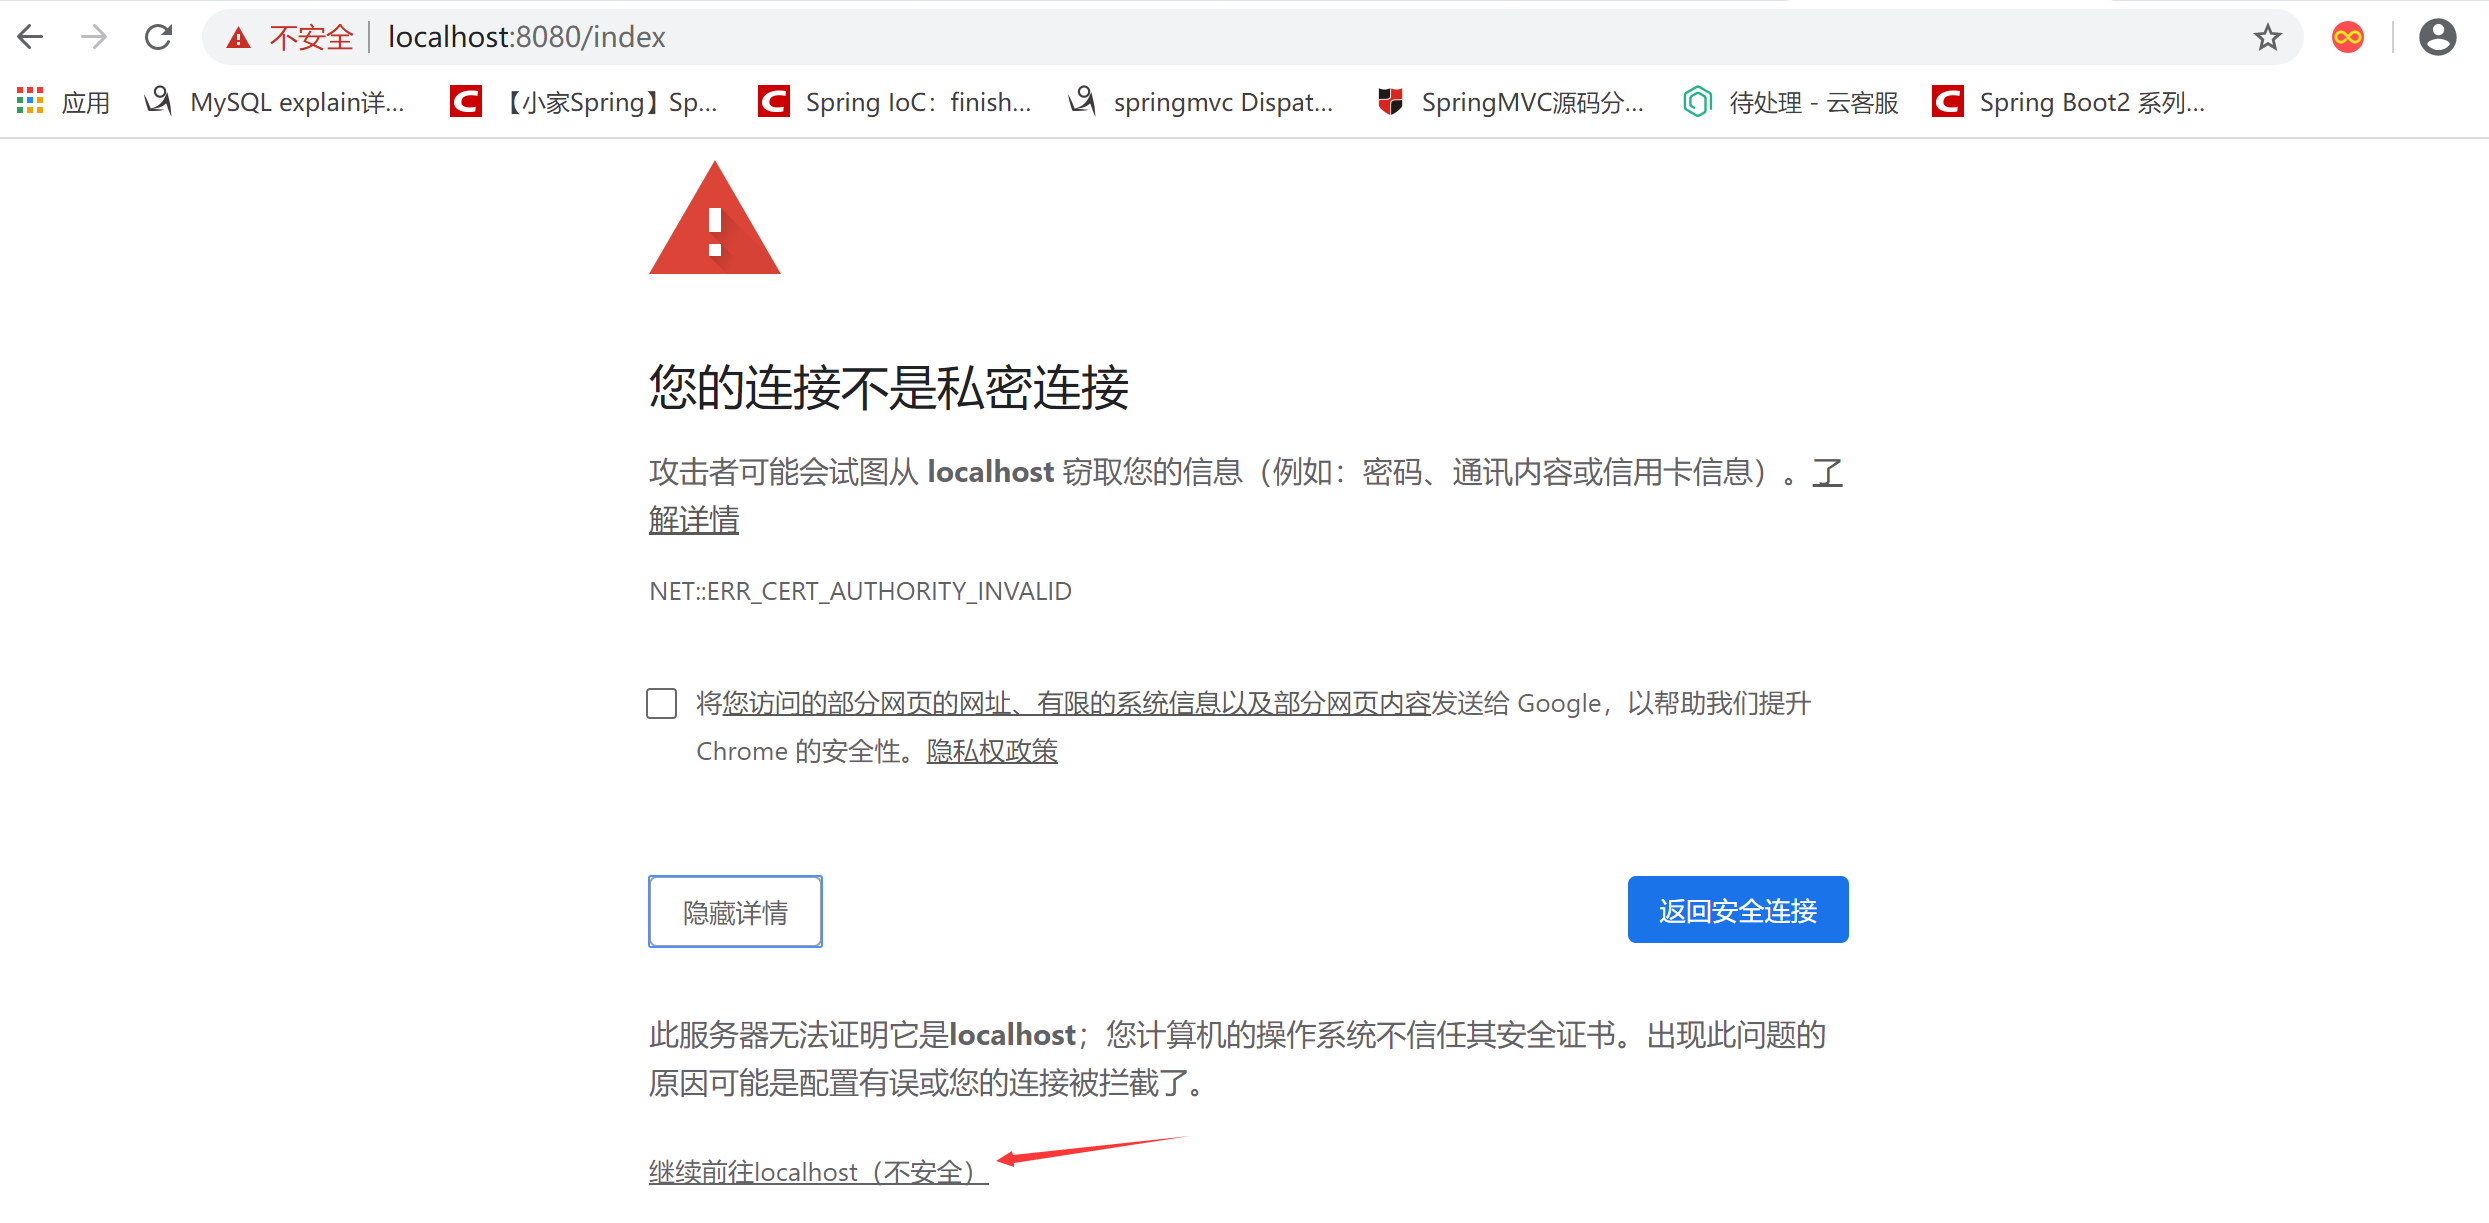
这是因为我们自己生成的 https 证书不被浏览器认可,不过没关系,我们直接点击继续访问就可以了(实际项目中只需要更换一个被浏览器认可的 https 证书即可)。

请求转发
考虑到 Spring Boot 不支持同时启动 HTTP 和 HTTPS ,为了解决这个问题,我们这里可以配置一个请求转发,当用户发起 HTTP 调用时,自动转发到 HTTPS 上。
@Configuration
public class TomcatConfig {
    @Bean
    TomcatServletWebServerFactory tomcatServletWebServerFactory() {
        TomcatServletWebServerFactory factory = new TomcatServletWebServerFactory() {
            @Override
            protected void postProcessContext(Context context) {
                SecurityConstraint constraint = new SecurityConstraint();
                constraint.setUserConstraint("CONFIDENTIAL");
                SecurityCollection collection = new SecurityCollection();
                collection.addPattern("/*");
                constraint.addCollection(collection);
                context.addConstraint(constraint);
            }
        };
        factory.addAdditionalTomcatConnectors(createTomcatConnector());
        return factory;
    }

    private Connector createTomcatConnector() {
        Connector connector = new
                Connector("org.apache.coyote.http11.Http11NioProtocol");
        connector.setScheme("http");
        connector.setPort(8080);
        connector.setSecure(false);
        connector.setRedirectPort(8443);
        return connector;
    }
}
在这里,我们配置了 Http 的请求端口为 8080,所有来自 8080 的请求,将被自动重定向到 8443这个 https 的端口上。
如此之后,我们再去访问 http 请求,就会自动重定向到 https。
结语
Spring Boot 中加入 https 其实很方便。如果你使用了 nginx 或者 tomcat 的话,https 也可以发非常方便的配置,从各个云服务厂商处申请到 https 证书之后,官方都会有一个详细的配置教程,一般照着做,就不会错了。


