Springboot整合Redis
整合Redis
经过 Spring Boot 的整合封装与自动化配置,在 Spring Boot 中整合Redis 已经变得非常容易了,开发者只需要引入 Spring Data Redis 依赖,然后简单配下 redis 的基本信息,系统就会提供一个 RedisTemplate 供开发者使用,但是今天松哥想和大伙聊的不是这种用法,而是结合 Cache 的用法。Spring3.1 中开始引入了令人激动的 Cache,在 Spring Boot 中,可以非常方便的使用 Redis 来作为 Cache 的实现,进而实现数据的缓存。
POM文件导入依赖
<!-- Spring Boot Redis依赖 -->
<!-- 注意:1.5版本的依赖和2.0的依赖不一样,注意看哦 1.5我记得名字里面应该没有“data”, 2.0必须是“spring-boot-starter-data-redis” 这个才行-->
<dependency>
    <groupId>org.springframework.boot</groupId>
    <artifactId>spring-boot-starter-data-redis</artifactId>
    <!-- 1.5的版本默认采用的连接池技术是jedis  2.0以上版本默认连接池是lettuce, 在这里采用jedis,所以需要排除lettuce的jar -->
    <exclusions>
        <exclusion>
            <groupId>redis.clients</groupId>
            <artifactId>jedis</artifactId>
        </exclusion>
        <exclusion>
            <groupId>io.lettuce</groupId>
            <artifactId>lettuce-core</artifactId>
        </exclusion>
    </exclusions>
</dependency>

<!-- 添加jedis客户端 -->
<dependency>
    <groupId>redis.clients</groupId>
    <artifactId>jedis</artifactId>
</dependency>

<!--spring2.0集成redis所需common-pool2-->
<!-- 必须加上,jedis依赖此  -->
<!-- spring boot 2.0 的操作手册有标注 大家可以去看看 地址是:https://docs.spring.io/spring-boot/docs/2.0.3.RELEASE/reference/htmlsingle/-->
<dependency>
    <groupId>org.apache.commons</groupId>
    <artifactId>commons-pool2</artifactId>
    <version>2.8.0</version>
</dependency>
配置文件配置
在application.properties 中配置redis信息
spring.redis.port=6379
spring.redis.host=127.0.0.1
# redis 数据库索引(默认为0)
spring.redis.database=0
# 连接池最大连接数(使用负值表示没有限制)
spring.redis.jedis.pool.max-active=8
# 连接池最大阻塞等待时间(使用负值表示没有限制)
spring.redis.jedis.pool.max-wait=-1
# reids 最大空闲连接
spring.redis.jedis.pool.max-idle=5
# 连接池最小空闲链接
spring.redis.jedis.pool.min-idle=0
# redis 超时时间(单位毫秒)
spring.redis.timeout=10000
创建Redis配置类
使用Jackson2作为序列化器
/**
 * Redis 配置类
 */
@Configuration
public class RedisConfiguration extends CachingConfigurerSupport {
    @Bean
    public RedisTemplate<String, Object> redisTemplate(RedisConnectionFactory factory) {
        RedisTemplate<String, Object> template = new RedisTemplate<>();
        // 配置连接工厂
        template.setConnectionFactory(factory);
        //使用Jackson2JsonRedisSerializer来序列化和反序列化redis的value值(默认使用JDK的序列化方式)
        Jackson2JsonRedisSerializer jacksonSeial = new Jackson2JsonRedisSerializer(Object.class);
        ObjectMapper om = new ObjectMapper();
        // 指定要序列化的域,field,get和set,以及修饰符范围,ANY是都有包括private和public
        om.setVisibility(PropertyAccessor.ALL, JsonAutoDetect.Visibility.ANY);
        // 指定序列化输入的类型,类必须是非final修饰的,final修饰的类,比如String,Integer等会跑出异常
        om.enableDefaultTyping(ObjectMapper.DefaultTyping.NON_FINAL);
        jacksonSeial.setObjectMapper(om);
        // 值采用json序列化
        template.setValueSerializer(jacksonSeial);
        //使用StringRedisSerializer来序列化和反序列化redis的key值
        template.setKeySerializer(new StringRedisSerializer());
        // 设置hash key 和value序列化模式
        template.setHashKeySerializer(new StringRedisSerializer());
        template.setHashValueSerializer(jacksonSeial);
        template.afterPropertiesSet();
        return template;
    }
}
使用fastJSON作为序列化器
POM文件导入fastjson
<!-- 将作为Redis对象序列化器 -->
<dependency>
    <groupId>com.alibaba</groupId>
    <artifactId>fastjson</artifactId>
    <version>1.2.68</version>
</dependency>
自定义序列化类
/**
 * 要实现对象的缓存,定义自己的序列化和反序列化器。使用阿里的fastjson来实现的比较多。
 * @param <T>
 */
public class FastJsonRedisSerializer<T> implements RedisSerializer<T> {
    private static final Charset DEFAULT_CHARSET = Charset.forName("UTF-8");
    private Class<T> clazz;

    public FastJsonRedisSerializer(Class<T> clazz) {
        super();
        this.clazz = clazz;
    }

    @Override
    public byte[] serialize(T t) throws SerializationException {
        if (null == t) {
            return new byte[0];
        }
        return JSON.toJSONString(t, SerializerFeature.WriteClassName).getBytes(DEFAULT_CHARSET);
    }

    @Override
    public T deserialize(byte[] bytes) throws SerializationException {
        if (null == bytes || bytes.length <= 0) {
            return null;
        }
        String str = new String(bytes, DEFAULT_CHARSET);
        return (T) JSON.parseObject(str, clazz);
    }
}
配置类
最近在整合redis的时候,发现数据从redis取出后无法强转为原先存入的对象,因为我的HttpMessage解析用的是FastJson,所以为了保持一致,我将RedisSerializer接口实现了,然后主动注入RedisTemplate,将其中的序列化方式指定为FastJson。但是在执行反序列化的最后一步JSON.parseObject(str, clazz);始终提示(autotype is not support),我的类型不支持被强转,然后去查了一下。
2017年3月15日,fastjson官方发布安全升级公告,该公告介绍fastjson在1.2.24及之前的版本存在代码执行漏洞,当恶意攻击者提交一个精心构造的序列化数据到服务端时,由于fastjson在反序列化时存在漏洞,可导致远程任意代码执行。
自1.2.25及之后的版本,禁用了部分autotype的功能,也就是”@type”这种指定类型的功能会被限制在一定范围内使用。
而由于反序列化对象时,需要检查是否开启了autotype。所以如果反序列化检查时,autotype没有开启,就会报错。
/**
 * Redis 配置类
 */
@Configuration
public class RedisConfiguration extends CachingConfigurerSupport {
    public RedisConfiguration() {
        //打开autotype功能,需要强转的类一次添加其后
        ParserConfig.getGlobalInstance()
                .addAccept("com.demo.entity");
    }

    /**
     * 设置 redis 数据默认过期时间
     * 设置@cacheable 序列化方式
     *
     * @return
     */
    @Bean
    public RedisCacheConfiguration redisCacheConfiguration() {
        FastJsonRedisSerializer<Object> fastJsonRedisSerializer = new FastJsonRedisSerializer<>(Object.class);
        RedisCacheConfiguration configuration = RedisCacheConfiguration.defaultCacheConfig();
        configuration = configuration.serializeValuesWith(RedisSerializationContext.SerializationPair.fromSerializer(fastJsonRedisSerializer)).entryTtl(Duration.ofDays(30));
        return configuration;
    }


    @Bean
    public RedisTemplate<Object, Object> redisTemplate(RedisConnectionFactory factory) {
        RedisTemplate<Object, Object> template = new RedisTemplate<>();
        //使用fastjson序列化
        FastJsonRedisSerializer fastJsonRedisSerializer = new FastJsonRedisSerializer(Object.class);
        // value值的序列化采用fastJsonRedisSerializer
        template.setValueSerializer(fastJsonRedisSerializer);
        template.setHashValueSerializer(fastJsonRedisSerializer);
        // key的序列化采用StringRedisSerializer
        template.setKeySerializer(new StringRedisSerializer());
        template.setHashKeySerializer(new StringRedisSerializer());
        template.setConnectionFactory(factory);
        return template;
    }
}
测试
@RunWith(value = SpringJUnit4ClassRunner.class)
@SpringBootTest(classes = {DempApplication.class})
public class RedisTest {
    @Autowired
    RedisTemplate redisTemplate;


    @Test
    public void test() {
        User user = new User();
        user.setId(1L);
        user.setUserName("xxx");
        user.setAddress("河南郑州");
        redisTemplate.opsForValue().set("user", user);
        User value = (User) redisTemplate.opsForValue().get("user");
        System.out.println(value);
    }
}
实现Session共享
前言
发展至今,已经很少还存在单服务的应用架构,不说都使用分布式架构部署, 至少也是多点高可用服务。在多个服务器的情况下,Seession共享就是必须面对的问题了。
解决Session共享问题,大多数人的思路都是比较清晰的, 将需要共享的数据存在某个公共的服务中,如缓存。很多人都采用的Redis,手动将Session存在Redis,需要使用时,再从Redsi中读取数据。毫无疑问,这种方案是可行的,只是在手动操作的工作量确实不少。
在这里采用的Spring-Session来实现。它使用代理过滤器,将Session操作拦截,自动将数据同步到Redis中,以及自动从Redis读取数据。从此,操作分布式的Session就像操作单服务的Session一样,可以为所欲为了。
POM文件导入依赖
<dependency>
    <groupId>org.springframework.session</groupId>
    <artifactId>spring-session-data-redis</artifactId>
</dependency>
配置文件配置
参考上面的配置
创建controller
/**
 * SessionShareController <br>
 * 〈session共享控制器〉
 *
 * @author XiaoQiang
 * @create 2019-7-6
 * @since 1.0.0
 */
@RestController
@RequestMapping(value = "/session")
public class SessionShareController {

  @Value("${server.port}")
  Integer port;


  @GetMapping(value = "/set")
  public String set(HttpSession session){
    session.setAttribute("user","wangwq8");
    return String.valueOf(port);
  }

  @GetMapping(value = "get")
  public String get(HttpSession session){
    return "用户:"+session.getAttribute("user")+",端口:"+port;
  }
}
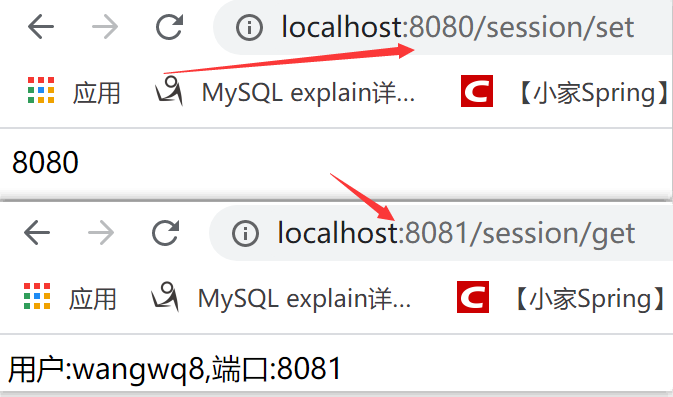
测试

总结
本文主要是Spring Session的简单使用,从上面可以看出,除了引入了Spring Session的jar, 其他方面,不管是代码还是配置,都与之没有什么关联,就相当于在操作最常用的HttpSession,在实际项目中用起来也是相当方便。
整合redisson
redisson简介
Redisson - 是一个高级的分布式协调Redis客服端,能帮助用户在分布式环境中轻松实现一些Java的对象 (Bloom filter, BitSet, Set, SetMultimap, ScoredSortedSet, SortedSet, Map, ConcurrentMap, List, ListMultimap, Queue, BlockingQueue, Deque, BlockingDeque, Semaphore, Lock, ReadWriteLock, AtomicLong, CountDownLatch, Publish / Subscribe, HyperLogLog)。
POM文件导入依赖
<dependency>
    <groupId>org.redisson</groupId>
    <artifactId>redisson-spring-boot-starter</artifactId>
    <version>3.12.5</version>
</dependency>
配置文件配置
参考上面的配置
redisson 配置类
/**
 * redisson 配置类
 */
@Configuration
public class RedissonConfig {

    @Value("${spring.redis.host}")
    private String host;

    @Value("${spring.redis.port}")
    private String port;


    @Bean
    public RedissonClient getRedisson() {

        Config config = new Config();
        config.useSingleServer().setAddress("redis://" + host + ":" + port);
        //添加主从配置
//        config.useMasterSlaveServers().setMasterAddress("").setPassword("").addSlaveAddress(new String[]{"",""});
        return Redisson.create(config);
    }

}
redisson操作类
/**
 * redisson操作类
 */
@Service("redissonService")
public class RedissonService {

    @Autowired
    private RedissonClient redissonClient;

    public void getRedissonClient() throws IOException {
        Config config = redissonClient.getConfig();
        System.out.println(config.toJSON().toString());
    }

    /**
     * `
     * 获取字符串对象
     *
     * @param objectName
     * @return
     */
    public <T> RBucket<T> getRBucket(String objectName) {
        RBucket<T> bucket = redissonClient.getBucket(objectName);
        return bucket;
    }

    /**
     * 获取Map对象
     *
     * @param objectName
     * @return
     */
    public <K, V> RMap<K, V> getRMap(String objectName) {
        RMap<K, V> map = redissonClient.getMap(objectName);
        return map;
    }

    /**
     * 获取有序集合
     *
     * @param objectName
     * @return
     */
    public <V> RSortedSet<V> getRSortedSet(String objectName) {
        RSortedSet<V> sortedSet = redissonClient.getSortedSet(objectName);
        return sortedSet;
    }

    /**
     * 获取集合
     *
     * @param objectName
     * @return
     */
    public <V> RSet<V> getRSet(String objectName) {
        RSet<V> rSet = redissonClient.getSet(objectName);
        return rSet;
    }

    /**
     * 获取列表
     *
     * @param objectName
     * @return
     */
    public <V> RList<V> getRList(String objectName) {
        RList<V> rList = redissonClient.getList(objectName);
        return rList;
    }

    /**
     * 获取队列
     *
     * @param objectName
     * @return
     */
    public <V> RQueue<V> getRQueue(String objectName) {
        RQueue<V> rQueue = redissonClient.getQueue(objectName);
        return rQueue;
    }

    /**
     * 获取双端队列
     *
     * @param objectName
     * @return
     */
    public <V> RDeque<V> getRDeque(String objectName) {
        RDeque<V> rDeque = redissonClient.getDeque(objectName);
        return rDeque;
    }


    /**
     * 获取锁
     *
     * @param objectName
     * @return
     */
    public RLock getRLock(String objectName) {
        RLock rLock = redissonClient.getLock(objectName);
        return rLock;
    }

    /**
     * 获取读取锁
     *
     * @param objectName
     * @return
     */
    public RReadWriteLock getRWLock(String objectName) {
        RReadWriteLock rwlock = redissonClient.getReadWriteLock(objectName);
        return rwlock;
    }

    /**
     * 获取原子数
     *
     * @param objectName
     * @return
     */
    public RAtomicLong getRAtomicLong(String objectName) {
        RAtomicLong rAtomicLong = redissonClient.getAtomicLong(objectName);
        return rAtomicLong;
    }

    /**
     * 获取记数锁
     *
     * @param objectName
     * @return
     */
    public RCountDownLatch getRCountDownLatch(String objectName) {
        RCountDownLatch rCountDownLatch = redissonClient.getCountDownLatch(objectName);
        return rCountDownLatch;
    }
}
分布式锁测试
@RunWith(value = SpringJUnit4ClassRunner.class)
@SpringBootTest(classes = {DempApplication.class})
public class RedisTest {

    private static final Logger log = LoggerFactory.getLogger(RedisTest.class);


    @Autowired
    private RedissonService redissonService;


    @Test
    public void test() throws InterruptedException {
        ExecutorService executorService = Executors.newFixedThreadPool(10);
        CountDownLatch countDownLatch = new CountDownLatch(10);
        final String recordId = "recordId_123";
        for (int i = 0; i < 10; i++) {
            executorService.execute(() -> {
                countDownLatch.countDown();
                log.info("开始并发执行: " + System.currentTimeMillis());
                tryLock(recordId);
            });
        }
        log.info("线程池完成:" + System.currentTimeMillis());
        executorService.shutdown();
        log.info("线程池退出:" + System.currentTimeMillis());
        Thread.sleep(10000);
    }

    public void tryLock(String recordId) {
        RLock lock = redissonService.getRLock(recordId);
        try {
            boolean bs = lock.tryLock(5, 6, TimeUnit.SECONDS);
            if (bs) {
                // 业务代码
                log.info("进入业务代码: " + recordId + ":" + System.currentTimeMillis());
                Thread.sleep(10);
            } else {
                log.info("数据已被锁定: " + recordId + ":" + System.currentTimeMillis());
            }
        } catch (Exception e) {
            log.error("出现错误...", e);
            lock.unlock();
        }
    }
}


